Use Linux Traffic Control as impairment node in a test environment (part 3)
Rigorously testing a network device or distributed service requires complex, realistic network test environments. Linux Traffic Control (tc) with Network Emulation (netem) provides the building blocks to create an impairment node that simulates such networks.
This three-part series describes how an impairment node can be set up using Linux Traffic Control. In the first post Linux Traffic control and its queuing disciplines were introduced. The second part showed which traffic control configurations are available to impair traffic and how to use them. This third and final part describes how to get an impairment node up and running!
Recap
We already know how Linux Traffic Control works, what queuing disciplines are available for impairing traffic and how to apply one ore more of those qdiscs to an interface.
Our goal is still to create an impairment node device that manipulates traffic between two of its Ethernet interfaces eth0 and eth1, while managing it from a third interface (e.g. eth2).
Impairment node system
First, we need a system on which the impairment node will run. Luckily, both the hardware and software restrictions are minimal.
The hardware should (1) be able to run a Linux operating system and (2) have at least 3 network interfaces. There are multiple vendors of small dedicated network devices (Portwell, Lanner, PCEngines,…) suitable for this task, but an older desktop computer should do the job as well. Running multiple impairments configurations in parallel or impairing multicast traffic obviously requires additional network interfaces (unless VLANs are used).
Since all Traffic Control functionality is located within the Linux kernel, it is available in all modern Linux distributions. So as far as software is concerned, a fresh server installation of any mainstream distribution (Fedora, Ubuntu or Debian) is ok!
Automation and configuration
The impairment node should be both easy to configure and easy to start. This means that a user should be able to simply alter a configuration and update the impairment node without going into Traffic Control details.
To achieve this, all Traffic Control operations are hidden within a single shell script, which you can find on GitHub under a permissive license.
$ tc.sh apply bypass0 [<impconf>]
$ tc.sh clear bypass0
where:
- Operation clear removes all existing impairment configurations and resets the interfaces.
- Operation apply clears everything as well, applies the specified impairment configuration(s) and resets the interfaces.
- bypass0 forms a layer 2 ethernet bridge between eth0 and eth1 on which the impairment configuration(s) are applied. You can easily modify the script to allow additional values, such as bypass1 and map them to a set of interfaces.
- If an impairment configuration impconf is passed, that single configuration will be applied. Otherwise one or more configuration will be retrieved from the lines of a configuration file tc.conf in the same directory as the script.
While it is possible to change existing impairment configurations, its simpler and safer (especially during development or debugging) to always start with a clean slate. This is also how the script operates.
Note the script explicitly excludes network management traffic – ARP, ICMP, IGMP, ICMPv6, DHCP and DHCPv6 – from impairment, since such traffic may be required to set up an impairment scenario.
Declarative impairment configurations
Impairment configurations can be passed to the script in a declarative way, either directly on the command-line or through the configuration file.
Each impairment configuration takes one of the following forms:
[<vlanid>];<symmetrical-configuration>
[<vlanid>];<downstream-configuration>;<upstream-configuration>
where:
- A non-empty vlanid field causes virtual interfaces to be created on bypassX for the specified VLAN ID and a layer2 bridge to be created between those virtual interfaces. Only traffic running on that particular VLAN is affected by the impairments.
- A single configuration is interpreted as symmetrical: if bypass0 links interfaces eth0 and eth1, the impairment is applied to both interfaces.
- Two configurations are used to differentiate between downstream and upstream traffic: if bypass0 links interfaces eth0 and eth1, downstream traffic flows from eth0 to eth1 and vice versa.
- Each impairment configuration consists of either a single qdisc configuration or two qdisc configurations separated by a comma. In the latter case, the qdiscs will be chained together.
Some example configurations and how they are handled by the script:
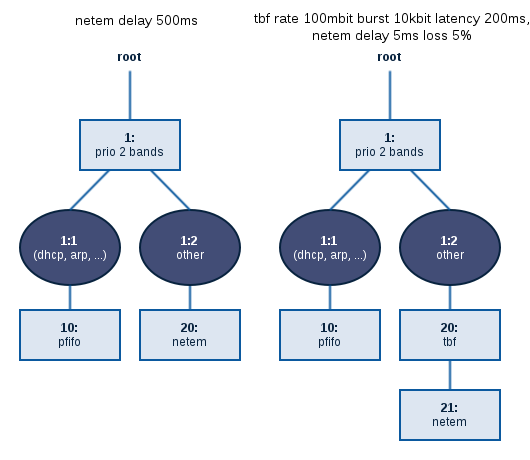
;netem delay 500ms
3110;netem delay 100ms;netem delay 300ms
3600;tbf rate 100mbit burst 10kbit latency 200ms,netem delay 5ms loss 5%
As we explained in the previous post, we typically only need the netem and tbf filters, so chaining two different impairments should suffice. The example tc.conf file on GitHub contains some more ideas.
Example output
The script prints out what it is doing. As an example, we specify a bidirectional impairment configuration for VLAN ID 2000.
$ sudo ./tc.sh apply bypass0 "2000;netem corrupt 10%"
Clearing previous configuration
 - Removing all bypass0 bridges...done
 - Removing all existing impairment configurations on the (virtual) bypass0 interfaces...done
 - Removing all virtual interfaces on the bypass0 interfaces...done
 - Removing default (non-virtual) bypass0 bridge...done
 - Bringing bypass0 interfaces down...done
Creating basic configuration
 - Creating ethernet bridge...done
 - Bringing default (non-virtual) bypass0 bridge online...done
Applying provided impairment configuration '2000;netem corrupt 10%'
Configuring VLAN 2000 with bidirectional impairment config:
   * 'netem corrupt 10%'
   * 'netem corrupt 10%'
 - Creating VLAN interfaces...done
 - Creating bridge between the VLAN interfaces...done
 - Bringing VLAN bridge online...done
 - Applying impairment configuration:
    * Constructing root handler...done
    * Constructing non-impaired queue for dhcp, icmp and arp traffic...done
    * Creating impaired queue for other downstream traffic...done
    * Creating impaired queue for other upstream traffic...done
 - Applying traffic filters...done
Restarting network...done
Further steps
Of course the implementation described here (and available in our impairment-node repository on GitHub) is specific to our needs and has itself been constantly evolving – allowing two qdisc definitions that are chained together was the latest addition.
The script can be freely adjusted and used (i.e. in accordance with the 3-clause BSD license) to suit other situations.
- Do you want to impair traffic on a layer 3 router instead of a layer 2 bridge? Simply install a Linux based router, such as VyOS, and run your traffic impairments on that. Strip the bridging and virtual interfaces creation from the script. In the case of VyOS, you can also use or enhance their traffic policy subsystem, so the configuration is integrated in the router’s command-line interface!
- Do you want to test different impairments on different physical sets of interfaces, instead of through different VLAN IDs? Adjust the script accordingly, so more bypasses are supported.
- You don’t want to exclude network management traffic? Simply remove the traffic filters section from the script, since all other traffic is sent through the impairment by default.
Whether you use the provided script directly, adapt it to your needs or simply take this blog post as a starting point for a fresh implementation, I’d love to hear about your specific use cases and the approach you are taking. Feel free to share them through the comments below!


Nice idea. We use this technique with ByteBlower together to see the impairment of TCP related traffic dempendent on higher latency.
🙂
I had no idea how powerful TC & NETEM could be. Great post with fantastic examples that worked on my test bench first try! Thanks for this tutorial.
Thanks for the feedback Ricardo! What kind of tests are you running?
Amazing post! I am learning QoS, this post is a great intro to tc, then I can do some experiment
Thanks flz and good luck mastering QoS! Of course there is a lot more to know about traffic engineering and shaping besides what I’ve written here. In fact, I would not encourage introducing these impairments as part of your everyday QoS strategy. 😉
Excellent post!!
Just tried to simulate a bug we had, due to problematic network at customer, this really helped simulating delayed NW conditions.
Cheers!
Great trilogy, Tim, thanks!